云计算管理平台之OpenStack简介及基础环境搭建
时间:2020-10-29来源:www.pcxitongcheng.com作者:电脑系统城
一、简介
什么是openstack?它是干嘛用的?
简单说openstack是云计算管理平台,主要对云环境中的虚拟机做增删查改;它能够将多台物理设备的资源(cpu/内存等)整合成一个大的资源池,然后根据openstack提供的api接口向用户提供使用;用户可以根据openstack提供的资源池接口来启动虚拟机,管理虚拟机;openstack 主要组成由控制节点和计算节点组成;其中控制节点由多个组件组成,每个组件都是以api的形式向外提供服务,这多个组件共同组成了控制节点,所以控制节点上运行了很多服务;计算节点通常是指提供物理硬件,用于启动虚拟机的物理设备;
二、架构
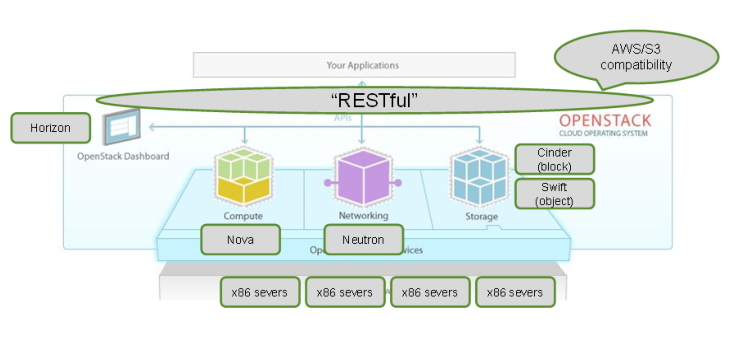
提示:openstack主要把底层的多台server的资源分为了三类,计算,网络和存储;用户可以通过openstack提供的web界面直接在openstack上启动虚拟机实例;
三、openstack基础环境准备
本次实验是以openstack R版为例,其中各服务器角色如下
| 主机名 | 角色 | ip地址 |
| node01 | 控制节点 | 192.168.0.41/24 |
| node02 | 数据库服务器 | 192.168.0.42/24 |
| node03 | 计算节点 | 192.168.0.43/24 |
1、各server上的基础环境配置
1)时间同步
| 1 2 3 4 5 6 7 8 9 10 11 12 13 14 15 16 17 18 19 20 21 22 23 24 |
[root@node01 ~]# grep server /etc/chrony.conf# Use public servers from the pool.ntp.org project.server time.test.org iburst# Serve time even if not synchronized to any NTP server.[root@node01 ~]# scp /etc/chrony.conf node02:/etc/chrony.conf 100% 1141 992.7KB/s 00:00 [root@node01 ~]# scp /etc/chrony.conf node03:/etc/chrony.conf 100% 1141 663.6KB/s 00:00 [root@node01 ~]# chronyc sources 210 Number of sources = 1MS Name/IP address Stratum Poll Reach LastRx Last sample ===============================================================================^* time.test.org 3 6 377 40 -15us[ -86us] +/- 20ms[root@node01 ~]# ssh node02 'chronyc sources'210 Number of sources = 1MS Name/IP address Stratum Poll Reach LastRx Last sample ===============================================================================^* time.test.org 3 6 377 49 -6552ns[ -15us] +/- 20ms[root@node01 ~]# ssh node03 'chronyc sources'210 Number of sources = 1MS Name/IP address Stratum Poll Reach LastRx Last sample ===============================================================================^* time.test.org 3 6 377 52 -30us[ -103us] +/- 20ms[root@node01 ~]# |
2)主机名解析
| 1 2 3 4 5 6 7 8 9 10 11 12 13 14 15 |
[root@node01 ~]# cat /etc/hosts127.0.0.1 localhost localhost.localdomain localhost4 localhost4.localdomain4::1 localhost localhost.localdomain localhost6 localhost6.localdomain6192.168.0.99 time.test.org time-node192.168.0.41 node01.test.org node01 controller192.168.0.42 node02.test.org node02192.168.0.43 node03.test.org node03192.168.0.44 node04.test.org node04192.168.0.45 node05.test.org node05192.168.0.46 node06.test.org node06[root@node01 ~]# scp /etc/hosts node02:/etc/hosts 100% 423 29.5KB/s 00:00 [root@node01 ~]# scp /etc/hosts node03:/etc/hosts 100% 423 46.5KB/s 00:00 [root@node01 ~]# |
3)关闭selinux、iptables和NetworkManager
| 1 2 3 4 5 6 7 8 9 10 11 12 13 14 15 16 17 18 19 20 21 22 23 24 |
[root@node01 ~]# sed -i 's@SELINUX=enforcing@SELINUX=disabled@g' /etc/selinux/config[root@node01 ~]# setenforce 0[root@node01 ~]# getenforcePermissive[root@node01 ~]# ssh node02 'sed -i 's@SELINUX=enforcing@SELINUX=disabled@g' /etc/selinux/config'[root@node01 ~]# ssh node02 'setenforce 0 && getenforce'Permissive[root@node01 ~]# ssh node03 'sed -i 's@SELINUX=enforcing@SELINUX=disabled@g' /etc/selinux/config'[root@node01 ~]# ssh node03 'setenforce 0 && getenforce' Permissive[root@node01 ~]# systemctl stop firewalld NetworkManager[root@node01 ~]# systemctl disable firewalld NetworkManager Removed symlink /etc/systemd/system/multi-user.target.wants/NetworkManager.service.Removed symlink /etc/systemd/system/dbus-org.freedesktop.NetworkManager.service.Removed symlink /etc/systemd/system/dbus-org.freedesktop.nm-dispatcher.service.[root@node01 ~]# ssh node02 'systemctl stop firewalld NetworkManager && systemctl disable firewalld NetworkManager'Removed symlink /etc/systemd/system/multi-user.target.wants/NetworkManager.service.Removed symlink /etc/systemd/system/dbus-org.freedesktop.NetworkManager.service.Removed symlink /etc/systemd/system/dbus-org.freedesktop.nm-dispatcher.service.[root@node01 ~]# ssh node03 'systemctl stop firewalld NetworkManager && systemctl disable firewalld NetworkManager'Removed symlink /etc/systemd/system/multi-user.target.wants/NetworkManager.service.Removed symlink /etc/systemd/system/dbus-org.freedesktop.NetworkManager.service.Removed symlink /etc/systemd/system/dbus-org.freedesktop.nm-dispatcher.service.[root@node01 ~]# |
提示:如果你的系统是最小化安装,这里还需要安装一些基础的包;yum install -y vim wget tree lrzsz gcc gcc-c++ automake pcre pcre-devel zlib zlib-devel openssl openssl-devel iproute net-tools iotop lsof ntpdate telnet bridge-utils;
4)各服务器配置阿里云的base仓库和epel仓库包
| 1 2 3 4 5 6 7 8 9 10 11 12 13 14 15 16 17 18 19 20 21 22 23 24 25 26 27 28 29 30 31 |
[root@node01 ~]# rm -rf /etc/yum.repos.d/*.repo[root@node01 ~]# wget -O /etc/yum.repos.d/CentOS-Base.repo http://mirrors.aliyun.com/repo/Centos-7.repo--2020-10-27 22:43:42-- http://mirrors.aliyun.com/repo/Centos-7.repoResolving mirrors.aliyun.com (mirrors.aliyun.com)... 118.116.3.238, 118.123.164.244, 118.123.164.119, ...Connecting to mirrors.aliyun.com (mirrors.aliyun.com)|118.116.3.238|:80... connected.HTTP request sent, awaiting response... 200 OKLength: 2523 (2.5K) [application/octet-stream]Saving to: ‘/etc/yum.repos.d/CentOS-Base.repo’100%[====================================================================================>] 2,523 --.-K/s in 0s 2020-10-27 22:43:42 (180 MB/s) - ‘/etc/yum.repos.d/CentOS-Base.repo’ saved [2523/2523][root@node01 ~]# wget -O /etc/yum.repos.d/epel.repo http://mirrors.aliyun.com/repo/epel-7.repo--2020-10-27 22:43:51-- http://mirrors.aliyun.com/repo/epel-7.repoResolving mirrors.aliyun.com (mirrors.aliyun.com)... 118.116.3.248, 118.123.164.120, 125.64.102.239, ...Connecting to mirrors.aliyun.com (mirrors.aliyun.com)|118.116.3.248|:80... connected.HTTP request sent, awaiting response... 200 OKLength: 664 [application/octet-stream]Saving to: ‘/etc/yum.repos.d/epel.repo’100%[====================================================================================>] 664 --.-K/s in 0s 2020-10-27 22:43:51 (95.0 MB/s) - ‘/etc/yum.repos.d/epel.repo’ saved [664/664][root@node01 ~]# ll /etc/yum.repos.d/total 8drwxr-xr-x. 2 root root 219 Oct 27 22:42 bak-rw-r--r--. 1 root root 2523 Jun 16 2018 CentOS-Base.repo-rw-r--r--. 1 root root 664 May 11 2018 epel.repo[root@node01 ~]# |
提示:在node02和node03上都要做以上操作;
2、在各节点上配置openstack R版的yum仓库
| 1 | [root@node01 ~]# yum install centos-release-openstack-rocky -y |
提示:以上操作会在/etc/yum.repos.d/目录下生成很多repo文件;
验证:查看/etcyum.repos.d/目录下是否多了很多repo文件?
| 1 2 3 4 5 6 7 8 9 10 11 12 13 14 15 16 17 |
[root@node01 ~]# ll /etc/yum.repos.d/total 56drwxr-xr-x. 2 root root 219 Oct 27 22:42 bak-rw-r--r--. 1 root root 2523 Jun 16 2018 CentOS-Base.repo-rw-r--r--. 1 root root 850 Jul 31 2018 CentOS-Ceph-Luminous.repo-rw-r--r--. 1 root root 1309 Apr 8 2020 CentOS-CR.repo-rw-r--r--. 1 root root 649 Apr 8 2020 CentOS-Debuginfo.repo-rw-r--r--. 1 root root 314 Apr 8 2020 CentOS-fasttrack.repo-rw-r--r--. 1 root root 630 Apr 8 2020 CentOS-Media.repo-rw-r--r--. 1 root root 1186 Aug 29 2018 CentOS-OpenStack-rocky.repo-rw-r--r--. 1 root root 612 Feb 1 2019 CentOS-QEMU-EV.repo-rw-r--r--. 1 root root 1331 Apr 8 2020 CentOS-Sources.repo-rw-r--r--. 1 root root 353 Jul 31 2018 CentOS-Storage-common.repo-rw-r--r--. 1 root root 7577 Apr 8 2020 CentOS-Vault.repo-rw-r--r--. 1 root root 616 Apr 8 2020 CentOS-x86_64-kernel.repo-rw-r--r--. 1 root root 664 May 11 2018 epel.repo[root@node01 ~]# |
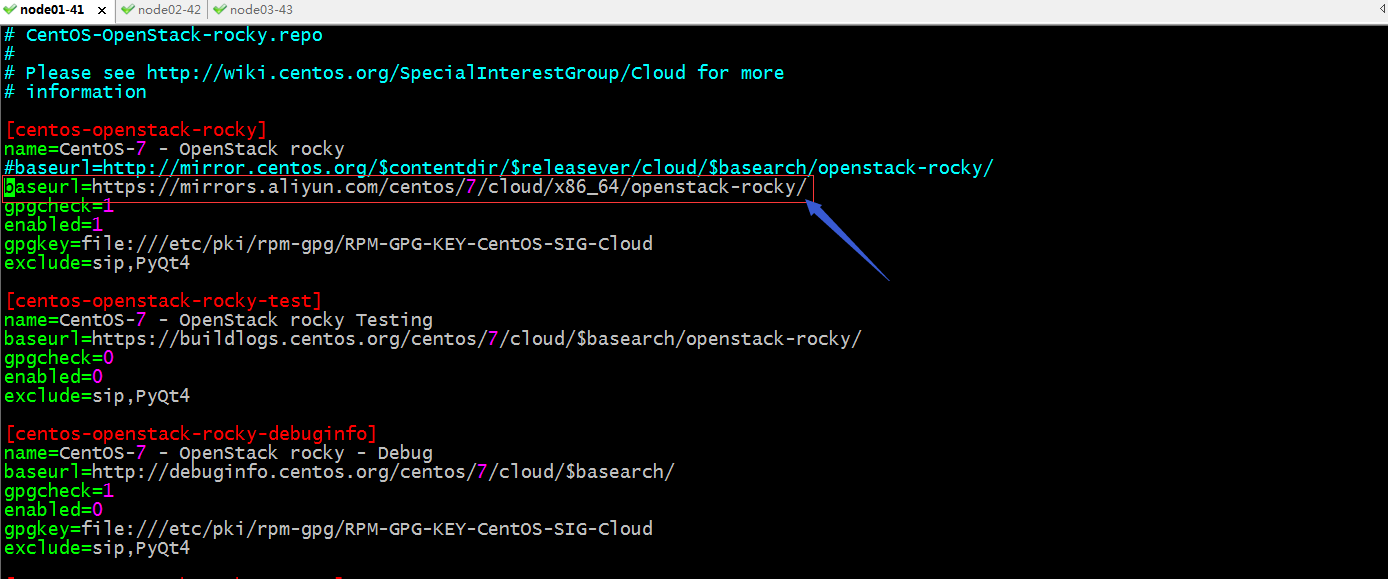
提示:这里面的repo文件仓库地址都是指向centos的官方仓库,如果国内下载速度慢,可以把对应的地址指向阿里云;
把centos-openstack-rocky.repo地址指向阿里云
提示:这里只需要改第一个就行,后面的仓库都是禁用了的,不用更改;
把node01上的centos-openstack-rocky.repo文件复制给node02和node03
| 1 2 3 4 5 |
[root@node01 ~]# scp /etc/yum.repos.d/CentOS-OpenStack-rocky.repo node02:/etc/yum.repos.d/CentOS-OpenStack-rocky.repoCentOS-OpenStack-rocky.repo 100% 1261 832.6KB/s 00:00 [root@node01 ~]# scp /etc/yum.repos.d/CentOS-OpenStack-rocky.repo node03:/etc/yum.repos.d/CentOS-OpenStack-rocky.repoCentOS-OpenStack-rocky.repo 100% 1261 387.4KB/s 00:00 [root@node01 ~]# |
提示:复制要在后两个节点都装了centos-release-openstack-rocky这个包以后,以免后续装包覆盖仓库地址文件;
3、在各节点安装python-openstackclient和openstack-selinux包
| 1 | [root@node01 ~]# yum install -y python-openstackclient openstack-selinux |
4、在node02上部署mariadb-server
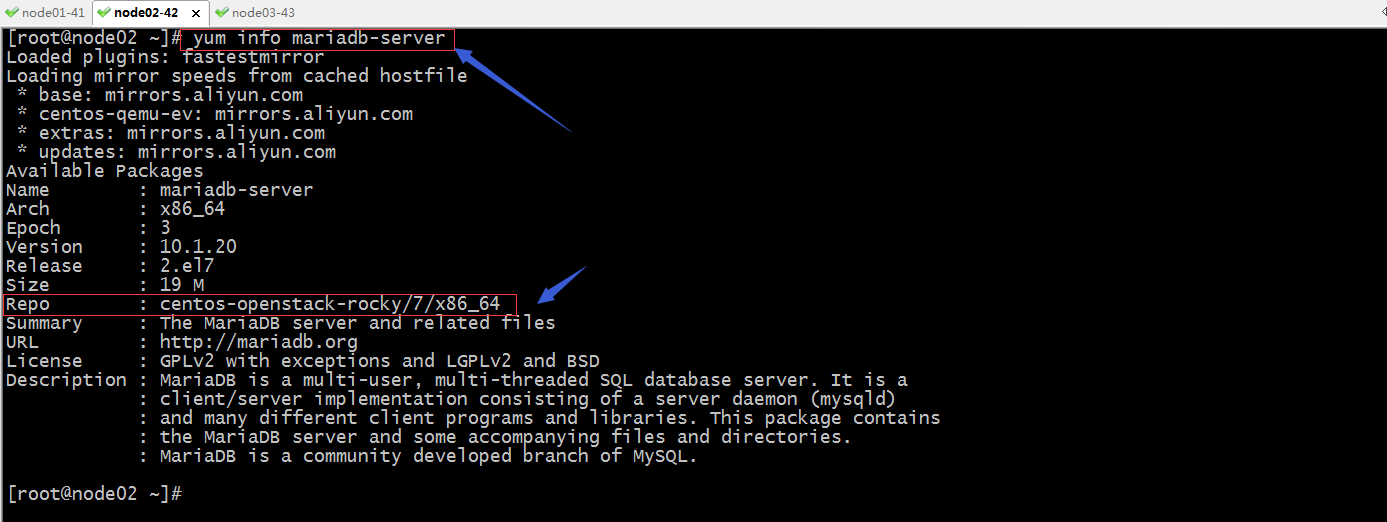
先查看mariadb-server这个包是否来自openstack-rocky这个仓库
提示:如果能够看到mariadb-server这个包来自centos-openstack-rocky这个仓库,说明我们配置的仓库没有问题;这里建议尽量使用openstacke-rocky仓库中提供的包,如果其他仓库提供的包可能存在不兼容的问题;
下载安装mairadb-server
| 1 2 3 4 5 6 7 8 9 10 11 12 13 14 15 16 17 18 19 20 21 22 23 24 25 26 27 28 29 30 31 32 33 34 35 36 37 38 39 40 |
[root@node02 ~]# yum install mariadb-server -yLoaded plugins: fastestmirrorLoading mirror speeds from cached hostfile * base: mirrors.aliyun.com * centos-qemu-ev: mirrors.aliyun.com * extras: mirrors.aliyun.com * updates: mirrors.aliyun.comResolving Dependencies--> Running transaction check---> Package mariadb-server.x86_64 3:10.1.20-2.el7 will be installed--> Processing Dependency: mariadb-common(x86-64) = 3:10.1.20-2.el7 for package: 3:mariadb-server-10.1.20-2.el7.x86_64--> Processing Dependency: mariadb-errmsg(x86-64) = 3:10.1.20-2.el7 for package: 3:mariadb-server-10.1.20-2.el7.x86_64--> Processing Dependency: mysql(x86-64) for package: 3:mariadb-server-10.1.20-2.el7.x86_64--> Processing Dependency: mysql-compat-client(x86-64) for package: 3:mariadb-server-10.1.20-2.el7.x86_64--> Processing Dependency: perl(DBD::mysql) for package: 3:mariadb-server-10.1.20-2.el7.x86_64--> Processing Dependency: perl(DBI) for package: 3:mariadb-server-10.1.20-2.el7.x86_64--> Processing Dependency: perl(Data::Dumper) for package: 3:mariadb-server-10.1.20-2.el7.x86_64--> Processing Dependency: rsync for package: 3:mariadb-server-10.1.20-2.el7.x86_64--> Processing Dependency: socat for package: 3:mariadb-server-10.1.20-2.el7.x86_64--> Running transaction check---> Package mariadb.x86_64 3:10.1.20-2.el7 will be installed--> Processing Dependency: mariadb-libs(x86-64) = 3:10.1.20-2.el7 for package: 3:mariadb-10.1.20-2.el7.x86_64……省略部分内容……Installed: mariadb-server.x86_64 3:10.1.20-2.el7 Dependency Installed: mariadb.x86_64 3:10.1.20-2.el7 mariadb-common.x86_64 3:10.1.20-2.el7 mariadb-config.x86_64 3:10.1.20-2.el7 mariadb-errmsg.x86_64 3:10.1.20-2.el7 perl-Compress-Raw-Bzip2.x86_64 0:2.061-3.el7 perl-Compress-Raw-Zlib.x86_64 1:2.061-4.el7 perl-DBD-MySQL.x86_64 0:4.023-6.el7 perl-DBI.x86_64 0:1.627-4.el7 perl-Data-Dumper.x86_64 0:2.145-3.el7 perl-IO-Compress.noarch 0:2.061-2.el7 perl-Net-Daemon.noarch 0:0.48-5.el7 perl-PlRPC.noarch 0:0.2020-14.el7 rsync.x86_64 0:3.1.2-10.el7 socat.x86_64 0:1.7.3.2-2.el7 Dependency Updated: mariadb-libs.x86_64 3:10.1.20-2.el7 Complete![root@node02 ~]# |
配置数据库
| 1 2 3 4 5 6 7 8 9 10 |
[root@node02 ~]# cat /etc/my.cnf.d/openstack.cnf[mysqld]bind-address = 0.0.0.0default-storage-engine = innodbinnodb_file_per_table = onmax_connections = 4096collation-server = utf8_general_cicharacter-set-server = utf8[root@node02 ~]# |
设置mariadb-server开机启动,并启动mairadb-server
| 1 2 3 4 5 6 7 8 9 10 11 |
[root@node02 ~]# systemctl enable mariadb.serviceCreated symlink from /etc/systemd/system/multi-user.target.wants/mariadb.service to /usr/lib/systemd/system/mariadb.service.[root@node02 ~]# systemctl start mariadb.service [root@node02 ~]# ss -tnlState Recv-Q Send-Q Local Address:Port Peer Address:Port LISTEN 0 128 *:22 *:* LISTEN 0 100 127.0.0.1:25 *:* LISTEN 0 128 *:3306 *:* LISTEN 0 128 :::22 :::* LISTEN 0 100 ::1:25 :::* [root@node02 ~]# |
5、在node01上安装python2-PyMySQL包,用于控制节点连接数据库驱动
| 1 2 3 4 5 6 7 8 9 10 11 12 13 14 15 16 17 18 19 20 21 22 23 24 25 26 27 28 29 30 31 32 33 34 35 36 37 38 39 40 |
[root@node01 ~]# yum install -y python2-PyMySQLLoaded plugins: fastestmirrorLoading mirror speeds from cached hostfile * base: mirrors.aliyun.com * centos-qemu-ev: mirrors.aliyun.com * extras: mirrors.aliyun.com * updates: mirrors.aliyun.comResolving Dependencies--> Running transaction check---> Package python2-PyMySQL.noarch 0:0.9.3-1.el7 will be installed--> Finished Dependency ResolutionDependencies Resolved============================================================================================================================== Package Arch Version Repository Size==============================================================================================================================Installing: python2-PyMySQL noarch 0.9.3-1.el7 epel 91 kTransaction Summary==============================================================================================================================Install 1 PackageTotal download size: 91 kInstalled size: 372 kDownloading packages:python2-PyMySQL-0.9.3-1.el7.noarch.rpm | 91 kB 00:00:00 Running transaction checkRunning transaction testTransaction test succeededRunning transaction Installing : python2-PyMySQL-0.9.3-1.el7.noarch 1/1 Verifying : python2-PyMySQL-0.9.3-1.el7.noarch 1/1Installed: python2-PyMySQL.noarch 0:0.9.3-1.el7 Complete![root@node01 ~]# |
6、在node02上部署memcached
| 1 2 3 4 5 6 7 8 9 10 11 12 13 14 15 16 17 18 19 20 21 22 23 24 25 26 27 28 29 30 31 32 33 34 35 36 37 38 39 40 |
[root@node02 ~]# yum install memcached -yLoaded plugins: fastestmirrorLoading mirror speeds from cached hostfile * base: mirrors.aliyun.com * centos-qemu-ev: mirrors.aliyun.com * extras: mirrors.aliyun.com * updates: mirrors.aliyun.comResolving Dependencies--> Running transaction check---> Package memcached.x86_64 0:1.5.6-1.el7 will be installed--> Finished Dependency ResolutionDependencies Resolved============================================================================================================================== Package Arch Version Repository Size==============================================================================================================================Installing: memcached x86_64 1.5.6-1.el7 centos-openstack-rocky 124 kTransaction Summary==============================================================================================================================Install 1 PackageTotal download size: 124 kInstalled size: 268 kDownloading packages:memcached-1.5.6-1.el7.x86_64.rpm | 124 kB 00:00:00 Running transaction checkRunning transaction testTransaction test succeededRunning transaction Installing : memcached-1.5.6-1.el7.x86_64 1/1 Verifying : memcached-1.5.6-1.el7.x86_64 1/1Installed: memcached.x86_64 0:1.5.6-1.el7 Complete![root@node02 ~]# |
配置memcached
| 1 2 3 4 5 6 7 |
[root@node02 ~]# cat /etc/sysconfig/memcachedPORT="11211"USER="memcached"MAXCONN="4096"CACHESIZE="1024"OPTIONS="-l 0.0.0.0,::1"[root@node02 ~]# |
设置memcached开机启动,并启动memcached服务
| 1 2 3 4 5 6 7 8 9 10 11 12 13 |
[root@node02 ~]# systemctl enable memcached.serviceCreated symlink from /etc/systemd/system/multi-user.target.wants/memcached.service to /usr/lib/systemd/system/memcached.service.[root@node02 ~]# systemctl start memcached.service[root@node02 ~]# ss -tnlState Recv-Q Send-Q Local Address:Port Peer Address:Port LISTEN 0 128 *:11211 *:* LISTEN 0 128 *:22 *:* LISTEN 0 100 127.0.0.1:25 *:* LISTEN 0 128 *:3306 *:* LISTEN 0 128 ::1:11211 :::* LISTEN 0 128 :::22 :::* LISTEN 0 100 ::1:25 :::* [root@node02 ~]# |
7、在node01上安装连接memcached驱动,python-memcached
| 1 2 3 4 5 6 7 8 9 10 11 12 13 14 15 16 17 18 19 20 21 22 23 24 25 26 27 28 29 30 31 32 33 34 35 36 37 38 39 40 |
[root@node01 ~]# yum install -y python-memcachedLoaded plugins: fastestmirrorLoading mirror speeds from cached hostfile * base: mirrors.aliyun.com * centos-qemu-ev: mirrors.aliyun.com * extras: mirrors.aliyun.com * updates: mirrors.aliyun.comResolving Dependencies--> Running transaction check---> Package python-memcached.noarch 0:1.58-1.el7 will be installed--> Finished Dependency ResolutionDependencies Resolved============================================================================================================================== Package Arch Version Repository Size==============================================================================================================================Installing: python-memcached noarch 1.58-1.el7 centos-openstack-rocky 38 kTransaction Summary==============================================================================================================================Install 1 PackageTotal download size: 38 kInstalled size: 123 kDownloading packages:python-memcached-1.58-1.el7.noarch.rpm | 38 kB 00:00:00 Running transaction checkRunning transaction testTransaction test succeededRunning transaction Installing : python-memcached-1.58-1.el7.noarch 1/1 Verifying : python-memcached-1.58-1.el7.noarch 1/1Installed: python-memcached.noarch 0:1.58-1.el7 Complete![root@node01 ~]# |
8、在node02上部署rabbitmq-server
| 1 2 3 4 5 6 7 8 9 10 11 12 13 14 15 16 17 18 19 20 21 22 23 24 25 26 27 28 29 30 31 32 33 34 35 |
[root@node02 ~]# yum install rabbitmq-server -yLoaded plugins: fastestmirrorLoading mirror speeds from cached hostfile * base: mirrors.aliyun.com * centos-qemu-ev: mirrors.aliyun.com * extras: mirrors.aliyun.com * updates: mirrors.aliyun.comResolving Dependencies--> Running transaction check---> Package rabbitmq-server.noarch 0:3.6.16-1.el7 will be installed--> Processing Dependency: erlang-eldap >= 18 for package: rabbitmq-server-3.6.16-1.el7.noarch--> Processing Dependency: erlang-erts >= 18 for package: rabbitmq-server-3.6.16-1.el7.noarch--> Processing Dependency: erlang-kernel >= 18 for package: rabbitmq-server-3.6.16-1.el7.noarch--> Processing Dependency: erlang-mnesia >= 18 for package: rabbitmq-server-3.6.16-1.el7.noarch--> Processing Dependency: erlang-os_mon >= 18 for package: rabbitmq-server-3.6.16-1.el7.noarch--> Processing Dependency: erlang-public_key >= 18 for package: rabbitmq-server-3.6.16-1.el7.noarch……省略部分内容……Installed: rabbitmq-server.noarch 0:3.6.16-1.el7 Dependency Installed: erlang-asn1.x86_64 0:19.3.6.4-1.el7 erlang-compiler.x86_64 0:19.3.6.4-1.el7 erlang-crypto.x86_64 0:19.3.6.4-1.el7 erlang-eldap.x86_64 0:19.3.6.4-1.el7 erlang-erts.x86_64 0:19.3.6.4-1.el7 erlang-hipe.x86_64 0:19.3.6.4-1.el7 erlang-inets.x86_64 0:19.3.6.4-1.el7 erlang-kernel.x86_64 0:19.3.6.4-1.el7 erlang-mnesia.x86_64 0:19.3.6.4-1.el7 erlang-os_mon.x86_64 0:19.3.6.4-1.el7 erlang-otp_mibs.x86_64 0:19.3.6.4-1.el7 erlang-public_key.x86_64 0:19.3.6.4-1.el7 erlang-runtime_tools.x86_64 0:19.3.6.4-1.el7 erlang-sasl.x86_64 0:19.3.6.4-1.el7 erlang-sd_notify.x86_64 0:1.0-2.el7 erlang-snmp.x86_64 0:19.3.6.4-1.el7 erlang-ssl.x86_64 0:19.3.6.4-1.el7 erlang-stdlib.x86_64 0:19.3.6.4-1.el7 erlang-syntax_tools.x86_64 0:19.3.6.4-1.el7 erlang-tools.x86_64 0:19.3.6.4-1.el7 erlang-xmerl.x86_64 0:19.3.6.4-1.el7 lksctp-tools.x86_64 0:1.0.17-2.el7 Complete![root@node02 ~]# |
设置rabbitmq-server开机启动,并启动mabbitmq-server服务
| 1 2 3 4 5 6 7 8 9 10 11 12 13 14 15 16 |
[root@node02 ~]# systemctl enable rabbitmq-server.serviceCreated symlink from /etc/systemd/system/multi-user.target.wants/rabbitmq-server.service to /usr/lib/systemd/system/rabbitmq-server.service.[root@node02 ~]# systemctl start rabbitmq-server.service[root@node02 ~]# ss -tnlState Recv-Q Send-Q Local Address:Port Peer Address:Port LISTEN 0 128 *:11211 *:* LISTEN 0 128 *:4369 *:* LISTEN 0 128 *:22 *:* LISTEN 0 100 127.0.0.1:25 *:* LISTEN 0 128 *:25672 *:* LISTEN 0 128 *:3306 *:* LISTEN 0 128 ::1:11211 :::* LISTEN 0 128 :::22 :::* LISTEN 0 100 ::1:25 :::* LISTEN 0 128 :::5672 :::* [root@node02 ~]# |
创建openstack用户并设置密码为openstack123
| 1 2 3 4 5 6 7 |
[root@node02 ~]# rabbitmqctl add_user openstack openstack123Creating user "openstack"[root@node02 ~]# rabbitmqctl list_usersListing usersopenstack []guest [administrator][root@node02 ~]# |
授权openstack用户对/下的所有文件有读写
| 1 2 3 4 5 6 7 |
[root@node02 ~]# rabbitmqctl set_permissions openstack ".*" ".*" ".*"Setting permissions for user "openstack" in vhost "/"[root@node02 ~]# rabbitmqctl list_permissionsListing permissions in vhost "/"guest .* .* .*openstack .* .* .*[root@node02 ~]# |
到此,openstack的基础环境和数据库节点就准备ok了,后续我们就可以在逐一安装各个控制节点上的服务和计算节点上的服务;
相关信息
-
-
2024-04-11
台式机电脑如何连接外接显示器 -
2024-04-11
小新系列打印机手机配置网络的方法教程 -
2024-04-11
Thinkpad 笔记本F1-F12快捷键分别是什么功能
-
-
ThinkPad蓝牙鼠标如何配对
ThinkPad蓝牙鼠标如何配对解答步骤41U5008鼠标驱动官网地址: https://support.lenovo.com/en_US/downloads/detail.page?&LegacyDocID=MIGR-67201 第一种方式是比较传统的:使...
2024-04-11
-
USB接口无法识别设备的解决方法
故障现象: USB设备U盘、移动硬盘等插入后提示无法识别的设备,确认设备本身正常,设备可加电,或插入设备后加电但无任何反应,无法使用。新型号机器多表现为黄色USB接口存在此问题,...
2024-04-11
热门系统总排行
- 4754次 1 雨林木风Win10专业版64位纯净版系统官方下载
- 3784次 2 电脑公司ghost win7 64位纯净专业版v2019.08
- 2502次 3 Win11官方最新版系统下载_Ghost Win11 22000.434(KB5009566)专业免激活版下载
- 2324次 4 深度技术 GHOST WIN10 X64 纯净版 V2019.09(64位)
- 1882次 5 电脑系统城ghost win7 sp132位 经典标准版 V2019.11
- 1794次 6 电脑公司 GHOST XP SP3 安全稳定纯净版 V2019.08
- 1733次 7 电脑公司ghost win7 32位精简旗舰版v2019.08
- 1700次 8 电脑公司 GHOST WIN10 X64 正式专业版 V2019.09(64位)
系统教程栏目
栏目热门教程
- 19982次 1 打印机显示休眠不打印怎么办 打印机深度休眠不打印解决方法
- 15456次 2 安装惠普打印机出现“新设备现已连接”一直不动怎么办?
- 14675次 3 打印机打印显示发送传真怎么办 为什么点打印出来发送传真
- 13891次 4 怎么用手机号查快递详细教程
- 13605次 5 qq群文件下载位置详情
- 12705次 6 富士施乐 DocuCentre S2011 双面打印设置方法
- 12525次 7 蓝牙耳机长按无反应怎么办 蓝牙耳机长按灯不亮的处理方法
- 10791次 8 拯救者Y7000如何使用录屏功能
- 10366次 9 由于找不到vcruntime140.dll无法继续执行代码的解决方法
- 10132次 10 按Fn+Q后无反应、无图标显示的解决方案
人气教程排行
- 56679次 1 联想笔记本进入bios的三种方法 联想笔记本怎么进入bios
- 51285次 2 打印机为什么打印出来是黑的_打印出来纸张表面黑的解决方法
- 39166次 3 笔记本电脑序列号在哪|笔记本电脑序列号怎么看
- 32783次 4 对于目标文件系统文件过大无法复制到u盘怎么解决方法
- 31658次 5 键盘全部按键没反应的解决方法 键盘被锁住按什么键恢复
- 30927次 6 键盘win键无效的解决办法 电脑win键失效怎么办?
- 30837次 7 mac连上wifi却上不了网如何解决 网络没问题但mac无法上网怎么办
- 27301次 8 小马激活工具 Win10正版激活 一键完美激活Win10_小编亲测
- 26444次 9 win7旗舰版激活密钥大全
- 25426次 10 电脑免费的加速器有哪些 永久免费的四款加速器推荐
站长推荐
- 12747次 1 Win11怎么激活?Win11系统永久激活方法汇总(附激活码)
- 6277次 2 联想拯救者win10一键恢复如何使用_联想win10一键还原孔使用方法
- 5819次 3 如何用u盘装系统?用系统城U盘启动制作盘安装Win10系统教程
- 5116次 4 怎么在u盘pe下给电脑系统安装ahci驱动
- 4682次 5 联想电脑开机出现PXE-MOF:Exiting Intel PXE ROM怎么解决
- 3948次 6 华硕笔记本bios utility ez mode设置图解以及切换成传统bios界面方法华硕笔记本bios utility ez mode设置图解以及切换成传统bios界面方法
- 3173次 7 win10怎么改为uefi启动_win10系统设置uefi启动模式的方法
- 1926次 8 CentOS 8 系统图形化安装教程(超详细)
- 1876次 9 win10系统下检测不到独立显卡如何解决
- 1850次 10 VMware中安装Linux系统(Redhat8)及虚拟机的网络配置方法
热门系统下载
- 4754次 1 雨林木风Win10专业版64位纯净版系统官方下载
- 4626次 2 Windows Server 2019 官方原版系统64位系统下载
- 4322次 3 网吧游戏专用Win7 Sp1 64位免激活旗舰版 V2021.05
- 4248次 4 Windows Server 2008 简体中文官方原版32位系统下载
- 3944次 5 Windows Server 2008 R2 简体中文官方原版64位系统下载
- 3784次 6 电脑公司ghost win7 64位纯净专业版v2019.08
- 3617次 7 电脑公司ghost win10 64位游戏专用精简网吧版v2020.05
- 3569次 8 Windows Server 2012 R2 官方原版系统64位系统下载


